|
A MODEL YACHT taken from The Handyman and Home Mechanic circa 1932
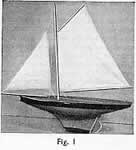
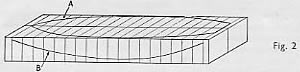
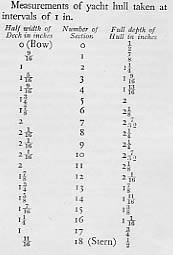
To make the model racing yacht illustrated in Fig.1 procure a flawless piece of soft pine about 19 in. long by a trifle over 41/2-in. wide and 2 3/8 in. thick and plane it up perfectly square to a finished size of 19 in. by 4 3/8 in. by 2 5/16 in. Draw a centre-line down the entire length of one of the wide faces and divide this line into 18 1 in. sections. With a try-square and pencil draw lines across the face at the marked positions at right angles to the centre and carry them down the narrow sides, as shown in Fig. 2 . The next step is to number the section lines, starting with the bow, and calling this No. 0, then 1, 2, and so on, and mark the shape of the deck-line by making points on both sides of the centre-line from the measurements given in column 1 of the table of measurements given below
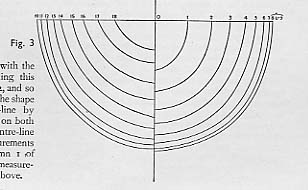
Having marked the points, trace a curve cutting the points. This is shown at A in Fig. 2. Turn the block over on its side and mark the corresponding depths as indicated in column 3 in the table. Trace the depth-curve as at B in Fig. 2, and repeat the process on the other side.A supply of thin cardboard is now needed to enable a set of templates to be cut out to correspond with the shapes at the various sections of the hull. These shaped pieces are used as guides when shaping the wood.Fig. 3 is a reduced drawing of the shapes at various sections.
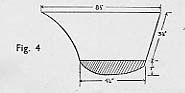
The on the right-hand side represent the shapes from the bow to the mid-section, while those at the left are those from the midsection to the stern. In setting out each outline should be traced on a separate piece of cardboard and then cut out with a pair of sharp scissors. Shaping the Hull.-Remove the waste from the bottom down to the curved depth lines on the sides of the hull, using a sharp, wide chisel for the purpose, and then remove the waste material round the deck lines.Mark a centre-line from bow to stern on the curved bottom of the hull and with a chisel pare off as much of the waste as possible, and finally obtain the correct shape by means of a spokeshave and the use of the templates, which should be tried at all sections as the work progresses. Rub the surface perfectly smooth with fine glass-paper As the next process consists of removing the waste from the interior of the hull, it is necessary to fix it down to a board having blocks to support the stem and stern. A flat board about 1 ft. 8 in. long by 6 in. wide and 5/8 in. thick should be selected. Make a centre-line down its length and drill two screwholes near the middle and drive a couple of 1-in. screws from the underside of the board into the bottom of the hull. The screws should be accurately centred so as to come in the portion of the hull where the keel-plate will be fixed. Shape a couple of blocks to correspond with the curved end sections of the hull, line them with felt or other soft material to prevent bruising the hull, and place them firmly in position.Now fix the base-board with the hull to the top of the bench, using screws for the purpose. Run a guide-line parallel to and 1/4 in. from the outside edge of the deck-curve and then remove as much waste as possible with a brace and bit, finishing it off with a sharp gouge. Great accuracy is not required, as the interior is hidden by the deck. This completes the most difficult part of the model. The Keel.-Shape out the keel-plate, which is 3/8 in. thick, as indicated in Fig. 4,not forgetting to form a sharp edge at the front to cut the water.
The lead at the bottom of the keel can be cast at home by first making a plaster-of-Paris mould and then pouring the molten metal into it, and when cool, finishing it off with a file. The lead is then fixed to the bottom of the keel plate by means of long, thin nails, drivenin after the metal has been drilled to receive them.A 3/8-in. wide slot should now be made at the bottom of the hull to take the keelplate, and the plate inserted into the groove and secured with screws driven in from the interior of the hull. The Rudder.-Drill a 1/4-in.-diameter hole in the hull to take the stem of the rudder, and then make the rudder from a strip of wood 1/8 in. thick. The rudder should be painted to match the hull and fitted after the deck has been fixed. Give the exterior another rub down with fine glass-paper and then apply a coat of gold size to fill up the pores of the wood, before painting. When dry, apply a thin coat of flat paint-that is, a paint without gloss-and then give a finishing coat of good quality gloss paint or enamel of the desired colour. A dark-coloured band about 5/8 in, deep should be made below deck-line and the lead keel also painted black in order to give the hull a good finish. The Deck consists of a piece of 3/16-in. thick pine. The wood should be cut out to follow the curves of the deckline of the hull, allowing 1/16-in. overlap all round. Smooth the deck with fine glass-paper, round the edges, and draw neat pencil-lines 1/4 in. apart to represent joints in the planks. Give the deck a coat of gold size, followed by a coat of good varnish. The Mast. Bore a 3/8-in. hole in thecentre of the deck, 6 1/2 in. from the bow, to take the mast. Then fix the deck to the hull by means of fine brass brads, taking great care not to split the wood. The mast consists of a piece of dowel rod, 15 in. long, 3/8 in. in diameter, tapering gently from the foot upwards, while the bowsprit and boom are made of similar material. The gaff is 1/4-in. dowel. These parts should receive a coat of gold size and then varnish. The Sails should be made of best quality linen. Paper patterns must be prepared, allowing sufficient margin for the hems. When the sails are ready, rig up the yacht, using fishing line for the lines and halyards. The shapes of the two sails are shown in Fig. 1.The foot of the mast is fitted with a spike, consisting of a headless nail, which fits into the wood at the bottom of the interior of the hull. No. 000 brass screw-eyes are used at the sides of the deck for fixing the stays, while ordinary pins, bent to form hooks, are fastened to the ends of the stays to enable the mast, etc., to be removed as required.
|