|
The Paxton Legacy III The third and last of the Paxton hulls that I restored was the larger cutter. It is essentially similar to the small one described in part I, but 22 inches long and with a displacement of four pounds. The hull was carved from two pieces of wood joined on the centre line. As can be seen from the photos of her in her ‘as found’ state, the deck was on and there were a number of fairly serious defects in the hull itself. The two halves had started to part at the bow and a large screw had been inserted to hold them together. There were also some nails through the deadwood; I’m not sure whether these were repairs or part of Paxton’s normal construction practice.
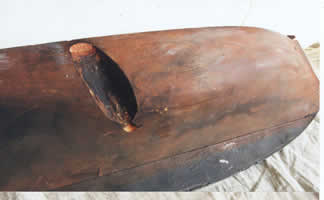
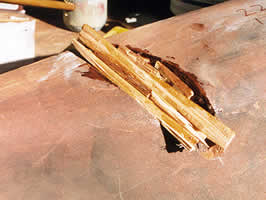
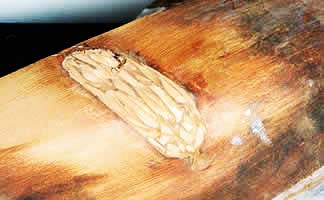
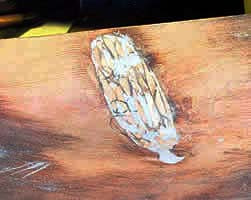
Most obvious was the large loss of fabric in one quarter. This was the result of a large knot having fallen out after the boat had been carved. It’s not clear to me why Paxton bothered to finish a hull which had so obvious a flaw, let alone attempted to repair it. When I had the boat the knot was adhering by the very last thread of glue where an attempt had been made to refit it. I don’t think it had ever been a satisfactory job, so I decided to fill the void with new wood, epoxy and cellulose filler. The photos show the sequence.
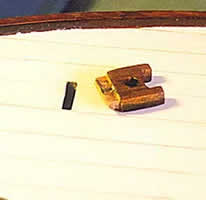
After a fair amount of effort and after the paint job was complete I had to look at the photos to remind myself which side of the boat it was on. The bitts for the inner end of the bowsprit were originally mounted from under the deck before it was fitted, but had fallen into the boat, so I made up a new set from mahogany designed to be set in from above.
An error that was not so obvious until I was well on into the job was an off centre mast hole in the deck. This was only discovered when I had made a mast tube with a wooden plug shaped to fit the quite sharp angle between the two halves of the hull. When it was tried for fit the mast had a pronounced set to port. It was fixed by opening out the deck hole and fitting a deck plate to hold the mast tube where it ought to have been. A matching mahogany plate was fitted round the head of the rudder tube. As the boat had a rudder tube and a projection on the lead to take a pin for the rudder post, she was clearly intended to have some form of steering. Though the original almost certainly had a weighted rudder, I had done that on earlier Paxton restorations, so decided to fit a simple reverse tiller gear. Once the hull was sound, the majority of the work was in the finish and the rig. The wood was cleaned up and the water based deck paint cleaned off; then the inside of the low bulwarks were stained and varnished, as was the slip of mahogany on the deck which represented the cabin. When it was quite dry all the varnished work was masked off and the deck painted a light grey. This was lined out in pencil. This was no more than straight fore and aft planking with no attempt at waterways or joggling. This is a cheap toy boat, not a work of art. The deck was given a couple of coats of satin varnish to provide a contrast to the brightwork. The hull was given several coats of primer and undercoat before being painted black. The underparts were painted in Humbrol ‘Old Bronze’ with a little black added. This gives a suitably tired looking coppered finish. The rig clearly had to be a gaff cutter and I made the lower sails (mainsail, fore staysail and jib) from cotton using the system I have developed for those who can’t or won’t sew. (There will be a full exposition of this method as an annexe to Ralph Nellist’s much more serious and truly vintage methods described in the forthcoming Curved Air Press publication Ralph’s Guide to Vintage Sailmaking. I hope this will be on the streets later in the year. Ralph has delivered his text and the design of the book is in hand.)
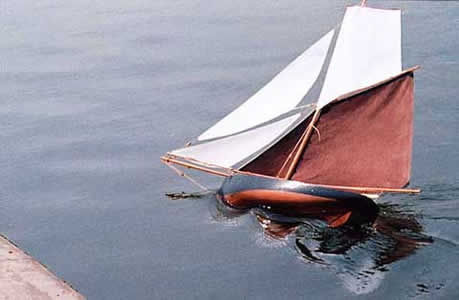
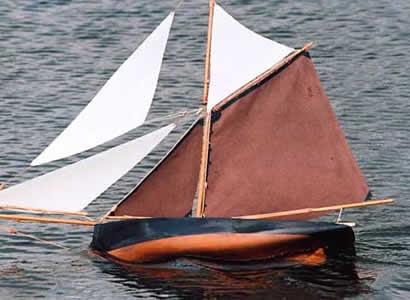
The mast carries a long topmast, which can be unshipped, being set in a pair of caps fabricated from copper sheet. It is set to a length that will carry the largest topsail, which I made in a really old fashioned lug headed style. The topmast is also drilled lower down to provide a lead for the halyard of a smaller jib headed topsail. For each of these there is a matching jib topsail to keep the boat balanced. These upper sails were made from Tyvek, which I wrote about in an earlier Turning Pole, mainly because I didn’t know if they were the right size and I wanted something that could be trimmed to suit on the pondside. First time out was at Dovercourt and the photos show how she looked under all three variants of her rig. The wind was up and down during the day, giving the opportunity to try all available combinations. I was fairly well satisfied with the performance, except that the reverse tiller gave too much weather helm, even on its closest take off hole. There need to be some changes to permit a more effective elastic centering line to be used. As tested it used a single fairly slight rubber band. What it needs is something longer and heavier that will do the job with less tension.
|