|
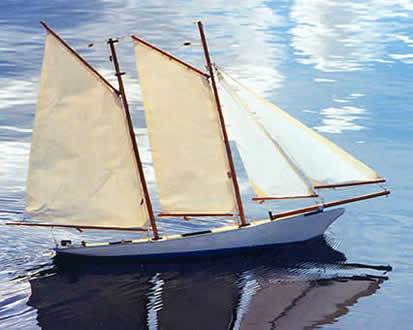
The Paxton Legacy, Part II The second of the Paxton toy boat hulls that I set out to restore was the schooner. This, though half as long again as the small cutter described in the article elsewhere on the site, had the same two pound displacement and was a much finer boned and rather elegant design. The construction was slightly different, in that though the main hull was carved out of a single piece, there was a lower portion to form the false keel and deadwood. I imagine this was to economically accommodate the considerable drag of the keel, which itself was called for by the use of a schooner rig, with its large mainsail mounted well aft. The hull had suffered a lot, both in the manufacturing process and during its century of waiting for someone to come along and rescue it.
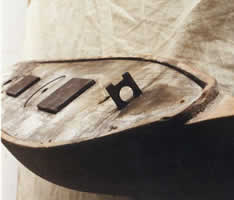
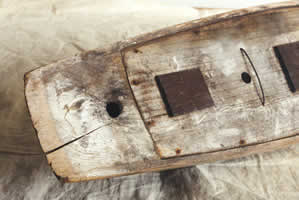
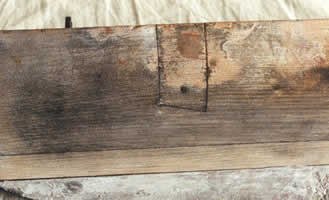
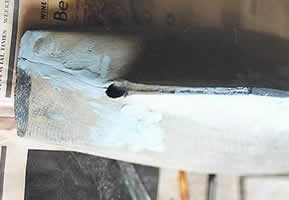
There was a crude repair in the topsides, probably where the gouge had gone through as the interior was being carved. It wasn’t possible to tell whether the patch had originally fitted better and had shrunk, or whether the job had been abandoned before Paxton got around to filling round the edges. It wasn’t too difficult to fix this; the single nail was punched down and the resulting depression and the surrounding slot filled with cellulose filler. The large split in the counter was a bit more of a problem. It must have been the result of a century of drying out of less than perfectly seasoned wood. I decided not to attempt to get the edges to go back together, but simply to fill the gap.
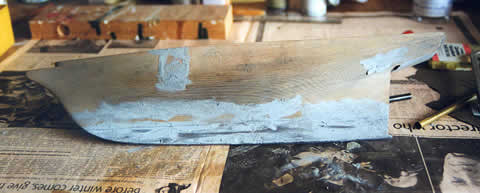
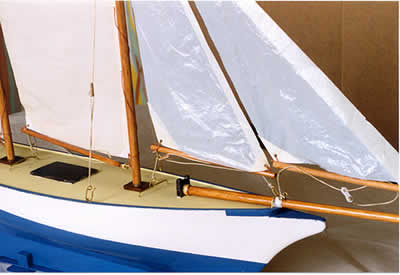
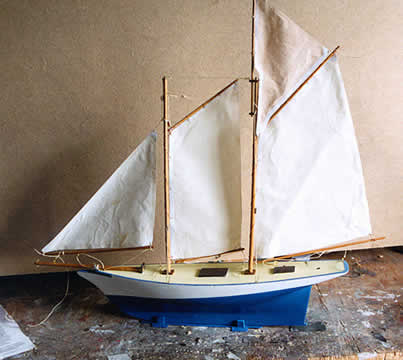
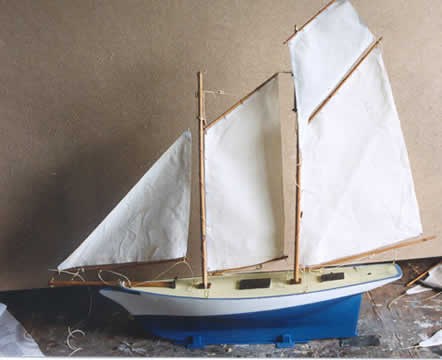
In an attempt to stop the wood moving further when the boat was sailed, I drilled out the rudder trunk to make it a tight fit on a piece of brass tube and paid close attention to sealing the joints between the tube and the wood, especially at the lower end. The idea was to prevent water getting into the wood of the counter through the rudder trunk. To protect the split from the outer end, I relied on a lot of paint and the expectation that, though the boat would be sailed (that’s what they’re for, not just to be collected), it wouldn’t spend all its life in the water and in a cold damp boat house. That apart, preparing the hull was a question of filling the odd knock and scrape, sanding off the water based deck paint and giving the whole thing several coats of white undercoat before masking off the water line and painting the lower portion blue. A small amount of blue decoration was added at the bow and the top of the rail was also painted blue. My preferred method of finding the waterline on a boat small enough to go into the bath is to float it and then sift a small quantity of fine dust onto the surface. Surface tension spreads it out all round the boat, it adheres to the hull and a carefully contrived and accurate straight lift out of the water gives a perfect, if very impermanent, waterline. For dark coloured boats use talcum powder, if the hull is white, I use microbubbles, which are brown. If you don’t mind the bath taking a coloured tide mark, you could use ink or food colouring. The deck was painted a pale cream and left unlined, as I wanted to emphasise the length of the hull by carrying the deck colour out to the end of the counter. Because the actual deck is so much shorter than the length of the boat, the lining on the original stopped well short of the counter. Unevenness in the joint could be disguised, more or less, if the deck were plain colour, but lining across the join drew unwelcome attention to the fact that there was a distinct step at one side of the joint. In painting the deck, I relied on a not too steady hand to avoid getting paint on the mahogany hatch covers and on the bowsprit fitting. It would have been better to mask them off. The existence of a rudder trunk and a small projection cast into the keel suggested that Paxton had intended something more than a weighted rudder in the way of steering. I chose to use a weighted tiller. My rudder was epoxied onto a tube rudder post which was drilled at the top for a tiller made from brass wire, with a small lead weight mounted on the end. The tiller is a push fit through the rudder post. It is cranked and can be rotated to ensure that the rudder lies central in the ‘neutral’ position. Designing the rig was relatively straightforward on paper. The CLR was determined by push testing the hull in the bath and a rig put together on paper that gave what appeared to be the right relationship and the right amount of sail for this small hull. To be on the safe side, only the main sail and foresail were made up in cotton. The headsails and topsail were made from plastic, so they could be chopped about on the pond side at the first outing and discarded once the right sizes had been worked out by trial and error.
The spars were made from pine dowel, and some care was taken to keep them light and dainty to match the style if the hull. The bowsprit fitting showed that Paxton had been more concerned about durability than appearance, so the bowsprit was made smaller than the fitting indicated and swelled at the inner end with a wrapping of paper. Because the butt end has to pass through the gammon iron, this had to be big enough to take the larger diameter and the bowsprit was wrapped in way of the gammon iron also. As I wanted to use a range of alternative styles and sizes of topsails, I made a number of topmasts to take each of them. These fitted into a pair of caps mounted on the mainmast, in something approximating to full size practice. The caps were made from scraps of mahogany, the larger one strengthened with a layer of 1/32 ply on the under side.
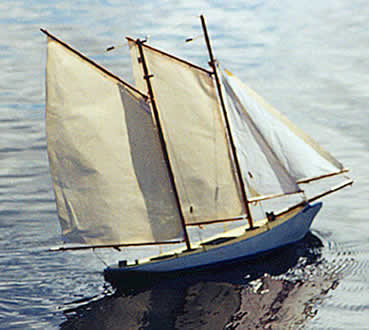
The necessary eyes, hooks and sheet horses were bent up from fine brass wire and those that were to be fixed in position were simply superglued into deck, gunwhale and spars as appropriate. Because I was concerned to keep the rig as uncluttered as possible, I made a set of very small bowsies from 1/16 ply and in some cases settled for a form of jamming cleat to take the topsail sheets. It means fewer bowsies, at the expense of ‘Irish whips’ in the rigging. You pays your money and makes your choice. One of the joys of very small boats like this is that the forces on the sails are small enough for almost anything to be enough to hold them; even a slip of masking tape to hold the end of a sheet will do the trick. The mounting of the masts caused a few problems. I had decided early on to fit mast tubes, partly as a way of reducing the diameter of the masts to something more fitting to the delicacy of the hull. The butt of each mast was also fitted into a length of brass tube. This ensures that you can get the mast out again, even after a long sailing session. I have, before now, been embarrassed by not being able to get the masts out of a boat which used plain wooden masts mounted in mast tubes, though admittedly this was after a day of almost continual rain. The problem was how to create a mast step. Lacking an endoscope, there was no way of seeing inside the hull. Careful probing revealed nothing in the way of a mast step, not even a hole drilled into the bottom. Drilling down through the mast hole didn’t seem likely to work and an attempt to glue the mast tube to the bottom of the boat failed, probably because of the accumulated dust and rubbish in there. In the end, I plugged the lower ends of the mast tubes and mounted the upper ends in small deck plates which were epoxied to the deck, so that the mast loads were supported by the deck. This is not the best engineering practice, but you can do it in a small model without too much risk of the whole thing collapsing.
More to the point she sailed well and remarkably fast. The small hull carried all the sail I had designed very easily in a lightish breeze. Without the rudder fitted, she seemed a little too inclined to screw up into the wind. I needed to keep the headsails tighter than I would ideally have wished to keep her moving. Fitting the rudder didn’t make a great deal of difference, probably because both the rudder and its weight were relatively small. I decided that as well as making some cotton headsails more or less the size of the plastic ones, I would make a single big headsail that would be of slightly greater area than the two separate ones, and rather more efficient. It would also be easier to adjust its position relative to the rest of the rig so as to get the sail plan into a perfect balance. There are photos of this and the topsails I have built since that outing, but so far she hasn’t sailed again. This is a particularly fine example of a good quality commercial toy boat and though there is no way of knowing whether the rig I created is anything like what Paxton would have used, there is no doubt that he knew what he was about. Any Edwardian child who was lucky enough to own one should have been as pleased as I was. More important, in view of my earlier experiments with a Paxton boat, she didn’t sink. Russell Potts
| |||||||